The Complete IVR Setup Guide for Asterisk

If you want to learn Asterisk read on, but if your just trying to setup an IVR/Auto Attendant system for your business RingRoost can do this in just a few clicks and we will even show you exactly how.
Setting up an IVR on Asterisk is nothing to crazy, but you will need to be a little tech savvy, or at least persistent. If you want the end result to be a live Asterisk IVR system that real people can call and ring your phone, you will also need a server with a public IP address, if you are just testing stuff out you can do this on a local computer - you just need Linux.
Our end results will be live phone number that when called, prompts the user to "press 1 for sales, 2 for tech support, 3 for billing department". If the caller presses one the call will be connected to the sales number, if they press 2 the tech support and so on...
You can call this number (919-375-3940) to get feel for what we are setting up (this example number does not ring a real phone, our end result will).
Overview of what we are doing.
So first we will download and install Asterisk, then we will build out what is called an "Asterisk Dialplan" (this is simply the program that tells Asterisk what we want our IVR to do), we will then use the softphone Linphone (ie: phone on our computer) to test our IVR application to make sure it's all working properly. Finally, if you want to take your system live, we will setup a real phone number (to handle inbound calls) and a SIP trunk (to handle outbound leg of call). Because I work at RingRoost, we will use them as our inbound/outbound call carrier in this example, you could of course use any carrier, but I doubt they can beat the RingRoost call quality and prices ☺.
Installing Asterisk
So first we need to install Asterisk, this is an open source telephone software that basically handles everything you can imagine when it comes to phone calls/ phone systems. Because Asterisk is so robust, it's kind of a beast to learn and to top it off there is no graphical interface. However, don't get scared away just yet - we are using it in a very narrow manor and I will walk you through everything you need to do with it .Make sure you have the most recent flavor of Linux installed. I am using Linode's $10/month plan in this example and running Ubuntu 14.04.
apt-get install asterisk
Run:
apt-get update && apt-get install asterisk
Note: this will install Asterisk 11.7 which is not most recent version, but is fine for what we are doing. If you want the most recent version you will need to install Asterisk from source. See my article here on doing that .
Here is a table for installing Asterisk on various versions of Linux:| Version | Command to Install | Verison Installed |
|---|---|---|
| Centos 7 | Have to install from source. See here. | Whatever |
| Centos 6 | rpm -Uvh http://packages.asterisk.org/centos/6/current/i386/RPMS/asterisknow-version-3.0.1-2_centos6.noarch.rpm && yump update && yum install asterisk | Asterisk 1.8 |
| Debian 7 | apt-get install asterisk | asterisk 1.8 |
| Debian 8 | apt-get install asterisk | Astersik 11 |
| Ubuntu 12 | apt-get install asterisk | Asterisk 1.8 |
| Ubuntu 14 | apt-get install asterisk | Asterisk 11 |
Basicly if you get the error "No package asterisk available." and your package manager is up to date you will need to install from source.
Make sure asterisk is running by trying to connect to the Asterisk client by running:
asterisk -rvvvvvvvv
Building Our IVR - Step 1 getting things working
Great now lets build out the IVR. To keep things simple at first we are just going to have our IVR say a few digits, this way we can connect to the IVR and make sure everything is working.Open up your Asterisk sip.conf file found at "/etc/asterisk/sip.conf" and put the below code in it. Note: remove all code that is currently in the sip.conf file. If the file does not exist, create it.
[general]
bindaddr = 0.0.0.0
context = my_ivr_menu
host=dynamic
type=friend
Open up your Asterisk extensions.conf file found at "/etc/asterisk/extensions.conf" and put the below code in it. Note: remove all code that is currently in the extensions.conf file. If the file does not exist, create it.
[my_ivr_menu]
exten => 30,1,Answer()
exten => 30,2,SayDigits(1234)
exten => 30,3,Hangup()
core restart now
asterisk -rvvvvvvvv
Now for testing, we need to install a softphone. We will use Linphone which you can download here: http://www.linphone.org/downloads-for-desktop.html .
We will now dial into our asterisk server on Linphone. In the "SIP address" bar input "sip:30@yourserversipaddresshere" and dial it (green icon). We should hear a voice say 1234.
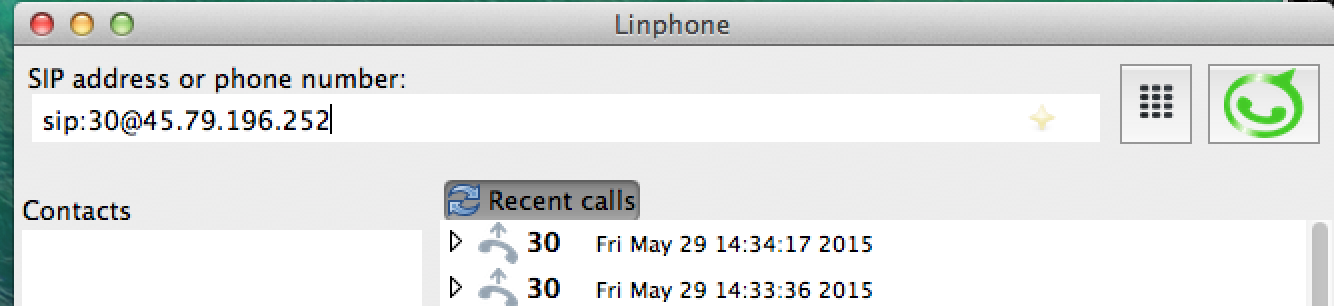
Notice that we are dialing the extension "30" this could be any number, I just chose a random extension.
Building Our IVR - Step 2 setting up 1,2,3 options menu
Now that we know things are working, we will dive a little deeper and get real IVR going. Now replace the code in your "/etc/asterisk/extensions.conf" file with the below code:[my_ivr_menu] exten => 30,1,Answer() exten => 30,2,Background(/var/lib/asterisk/sounds/ivr_promt_user) exten => 30,3,Hangup() exten => 1,1,Playback(/var/lib/asterisk/sounds/sales_message) exten => 1,2,Hangup() exten => 2,1,Playback(/var/lib/asterisk/sounds/tech_message) exten => 2,2,Hangup() exten => 3,1,Playback(/var/lib/asterisk/sounds/billing_message) exten => 3,2,Hangup()
You will notice we are playing some audio files on asterisk. You can of course change this audio files to play whatever you want. You can download the audio files for this example here.
You will then need to unzip and upload the 4 audio files into "/var/lib/asterisk/sounds/" directory on your asterisk server.
dialplan reload
Now dial into your IVR again and try it out by pressing 1,2,3.

Note: Linephone (annoyingly) appends what you dial to the "SIP" address so if you hangup and try to dial in again make sure your IP address does not have the appended digits on it.
Great Job if you made it this far! At this point you should have a working IVR system. The only issue is we are still stuck in the VoIP world meaning only people who can dial an "SIP" address can reach our IVR. This of course is not practical for real world business, so now we need to get a real phone number to handle calls and connect to the PSTN to make standard phone calls. In order to do this you will need to either pay hundreds of thousands of dollars in licensing and setup fees to become a LEC or use RingRoost as your carrier (or find another carrier ☹ ).
Building Our IVR - Step 3 going live with an inbound phone number
First thing we need to do is get a phone number with RingRoost and point that number to our Asterisk box. You will need to create a RingRoost account here , if you don't have one , add some funds to get started, and then order a number under the number tab here .If you are unfamiliar with how RingRoost Works here is quick intro video.
Now on your RingRoost PBX builder drag and drop an "Answer Call" control onto your PBX and select your phone number. Then drag and drop a "Dial Control" onto your PBX and connect it with the "Answer Call" control. In the "Dial" Control remove the phone number and add "SIP Address" with "30@youriaddresshere" as the SIP address value. It should look like this:
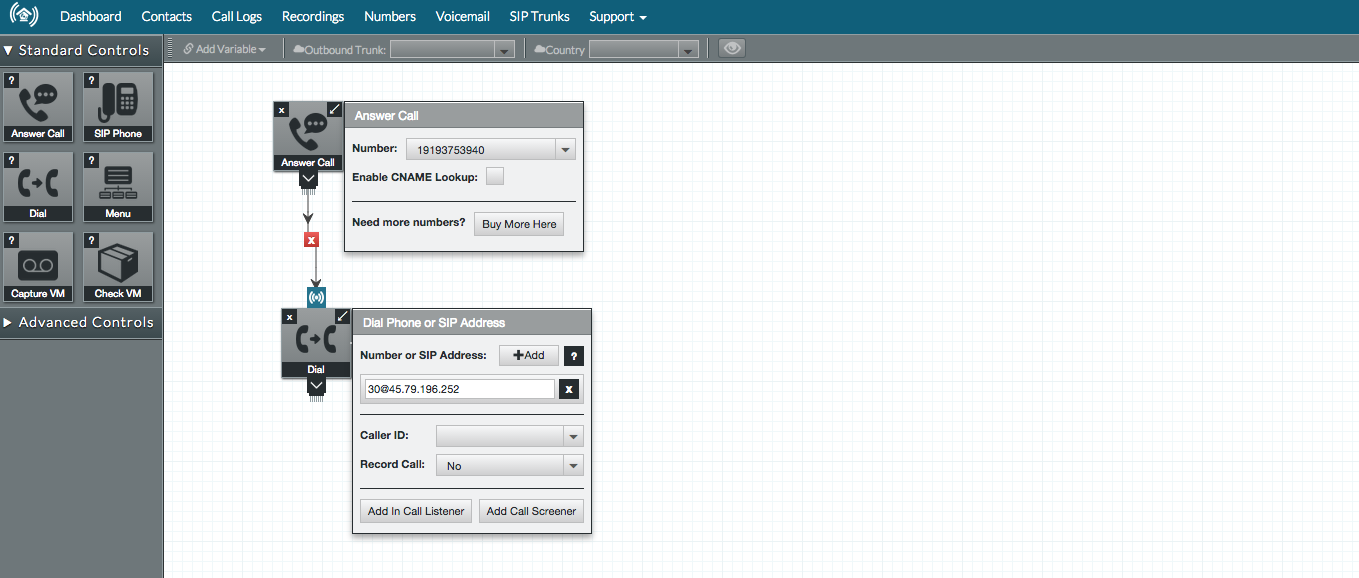
Save your PBX and then call your phone number from any phone. You should hear the prompt and be able to press 1, 2 or 3 and hear that department's message.
Building Our IVR - Step 4 going live with outbound dialing
Lastly, we need our system to actually dial phone numbers in order to connect with a particular department - simply telling a person they reached a department does not do much good.
First we need to drag and drop a "SIP Phone" control onto our PBX and save it. We will use this as our outbound trunk. Make note of the "Sip User" & "Sip Password" fields (make sure to keep these safe).
We will need to change our "/etc/asterisk/sip.conf" file to look like the below example. You will need to change "sip_user_here" and "sip_password_here" to your SIP username/password.
[general]
bindaddr = 0.0.0.0
context = my_ivr_menu
host=dynamic
type=friend
register => sip_user_here:sip_password_here@ringroost.com

[ringroost]
host=ringroost.com
type=friend
secret=sip_password_here
username=sip_user_here
disallow=all
allow=ulaw
allow=g729
We also need to change our "/etc/asterisk/extensions.conf" file to look like this:
[my_ivr_menu]
exten => 30,1,Answer()
exten => 30,2,Background(/var/lib/asterisk/sounds/ivr_promt_user)
exten => 30,3,Hangup()

exten => 1,1,DIAL("SIP/17049448765@ringroost")
exten => 1,2,Hangup()

exten => 2,1,DIAL("SIP/17049448765@ringroost")
exten => 2,2,Hangup()

exten => 3,1,DIAL("SIP/17049448766@ringroost")
exten => 3,2,Hangup()
core restart now
Note: Change the phone numbers to be whatever numbers you want to call.
Now go ahead and call your Ringroost phone number and try out your new IVR call system. Now when someone presses 1,2,3 they will be connected to that particular phone number instead of just hearing a recording. Pretty cool right.
Feel free to tweet me @taylorhawkes if there are any issue in this tutorial.
Thanks to these various resources:
http://the-asterisk-book.com/1.6/einfache-ivr.html
http://www.asteriskguru.com/tutorials/ivr.html
http://www.voip-info.org/wiki/view/Asterisk+cmd+Dial
http://voipfreak.net/how-to-install-asterisk-on-debian/
https://www.centos.org/forums/viewtopic.php?t=1811
http://blogs.digium.com/2012/11/05/how-to-install-asterisk-11-on-centos-6/
- Resources
- User Manual
- Forums
- Help Videos
- Blog
- FAQ's
- Office Phone System Settup
- PBX Setup
- SIP Phone System